Learn the commands to install and configure Ansible on Rocky Linux 8 or CentOS to automate the process of installing and configuring multiple Linux servers simultaneously.
If you have to manage multiple Linux servers then manually configuring and installing software on each of them is not only a time-consuming but also a labor-intensive task. Thus, Automation or orchestration is used in such environments.
There are already well know applications available to perform orchestration for server systems/data centers such as Ansible, Puppet, Chef, and few others. Well, here we learn about Ansible and how to use it to centrally manage multiple servers for installing various packages; code deployment, network configuration, cloud management, and much more.
Ansible is an open-source project sponsored by RedHat, thus if somebody wants, support and a graphical interface for Ansible they can go for the paid additions ‘Tower’offered by RedHat. One of the biggest advantages of Ansible is the ready-made “playbooks” that are made available on GitHub.
Ansible works in the push procedure and does not require any further installation on the individual systems besides SSH and Python. Compared to Chef and Puppet, the management and use of Ansible is easier,
Contents
The steps and commands given here to install Ansible are also applicable for AlmaLinux and CentOS 8.
On your Rocky Linux 8 server or desktop, go to the command terminal and first run the system update command where you are planning to set up Ansible.
To install Ansible on Rocky Linux 8 are available in the EPEL repository while other dependencies can be resolved and installed through default repos- baseos and appstream. Thus, enable EPEL on your Linux using the default package manager-
Now, run the main Ansible command that will fetch and install its packages along with other requirements such as Python.
Accept the request to install packages and GPG key by typing – Y and hit
Let’s check the installer version of Ansible on our system using-
Something this will be the result if everything is working fine-
The servers which you want to manage using Ansible must have SSH installed and port 22 opened in the firewall to access them from other systems such as the one installed with Ansible.
Here we are using one Ubuntu, Debian, and CentOS as servers that we will use to configure using Ansible. Thus, to install the SSH server and open port 22 on them, you can use these commands.
For Ubuntu & Debian servers-
to allow port 22 in firewall-
For RHEL or CentOS
Allow 22 in firewall-
So, here to perform this tutorial we have three servers Ubuntu, Debian, and CentOS, here are the IP addresses in our case.
To install packages or perform some deployment on a remote target server, create a pair of SSH keys on localhost and then push them on each remote server so that we can manage them using SSH.
Simply type and hit the Enter key multiple times until the generation of keys is not done.-
Now, push the generated key on Rocky Linux to remote servers that you want to configure or manage. You should know the user name of the remote server or use the default root user.
Note: Replace h2s with remote servers’ sudo users or use the default root. Also, replace the Ip-address with your server’s.
Now, on each server run the below command, so that we can run commands with sudo on them using Ansible but without entering a password.
In Ansible, we create a file where we will define all the remote host or target system which we want to manage. We can also create a group of hosts, for example, one group is a Web server that only contains a remote system running some web servers such as Apache, and the other can be a group Mysql running database server and so on. The Inventory file is also important because using it the command, modules, and tasks in a playbook will operate.
So, as here in this tutorial we have three remote servers, let’s add them to the Ansible host file.
If you don’t want to create any group then simply paste your remote server Ip-address or domain name there in the file, whereas for creating a group you have to specify that before adding Ip-addresses. You can edit the default Ansible inventory file values that would already have some examples or add your own at the end of the file.
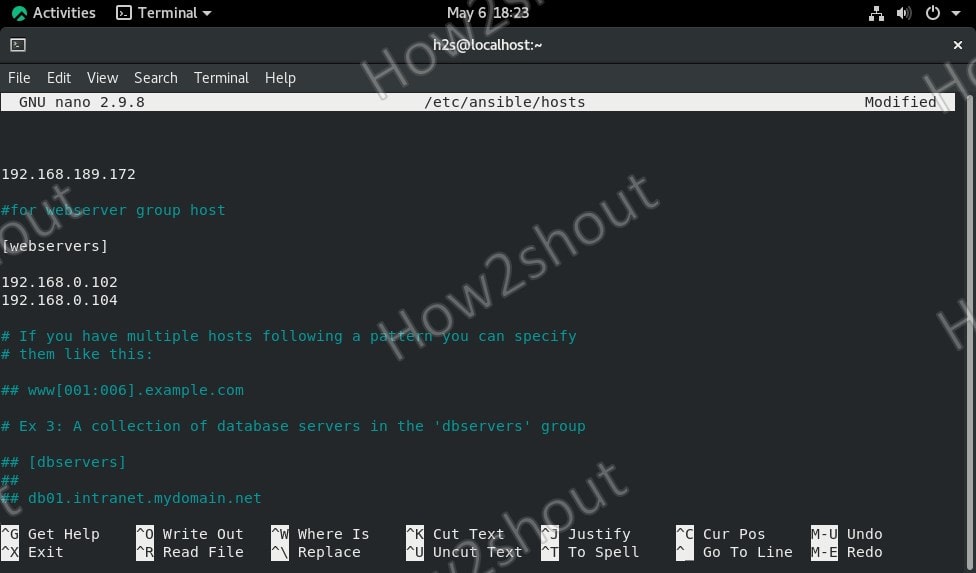
Here I am adding two servers for a host group identified by webservers and one server will define as an individual.
In the screenshot, you can see-
It is an ungroup server
whereas
are in a group called webservers. The benefit of creating a group is, we can issue one command to a whole set of servers defined in that particular group of hosts. For example, I can install an apache server on all remote servers added in a group called webservers simultaneously. In the same way, you can define database groups and others.
Note- Inventory with custom SSH port
If you are using some server not with default 22 SSH port, for example, a server running on Docker then we can also define that with the Ip-address. Example-
⇒In the above command replace the IP address, remote-server-username, and port number and add it to the inventory file.

To save the file just press Ctrl+X, Type-Y, and hit the Enter key.
As we have created the inventory file successfully, let’s check whether our Ansible could ping all the added servers or not, for that-
To ping group of hosts-
example– ansible -m ping web-servers
To ping a single server
example– ansible -m ping 192.168.189.172
To ping all.
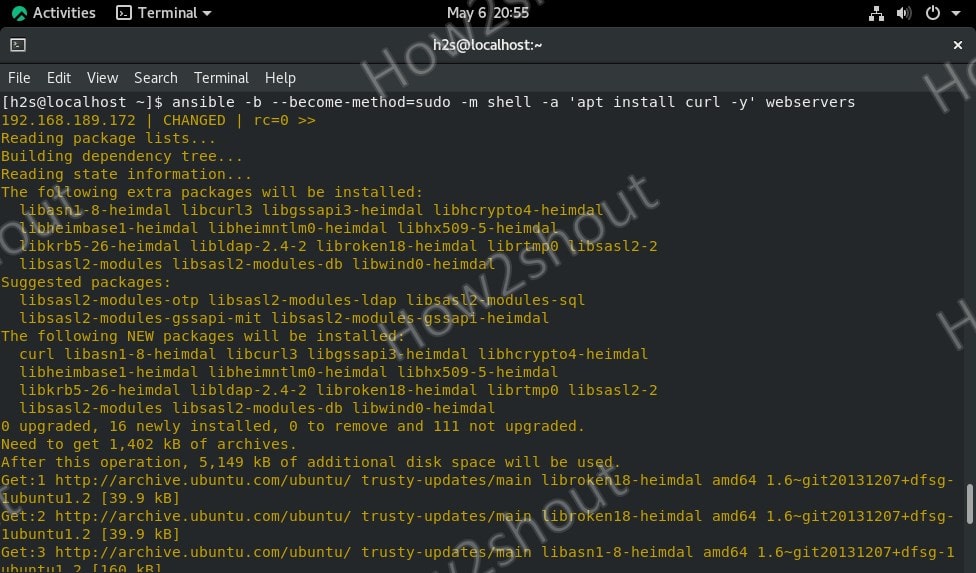
Now, let’s say you want to install an Apache web server on one group of servers you have defined in the Inventory file. As here we already named one webserver, thus we use that, you can use whatever name you have given to your group of servers.
Command syntax ansible -b --become-method=sudo -m shell -a 'command to execute' webservers
For example, running the update and installing apache server on remote Debian and Ubuntu systems simultaneously.
Installing Apache
To run the same above command for all defined remote PCs run-
For ungroup hosts, you can use their IP addresses, example-
You can also use other commands that don’t require sudo such as for checking uptime-
The same above command can be used for other purposes, just replace uptime with the command that you want to execute on a remote server and also change group-name/IP-address.
For more information refer to official Documentation.
Heyan Maurya Linux, Rocky Linux
Heyan Maurya AlmaLinux, Rocky Linux
Heyan Maurya AlmaLinux, Linux
Heyan Maurya AlmaLinux, CentOS, Rocky Linux
document.getElementById( “ak_js_1” ).setAttribute( “value”, ( new Date() ).getTime() );
This site uses Akismet to reduce spam. Learn how your comment data is processed.
Linux Shout crafted as a part of our main portal H2S Media to publish Linux related tutorials and open source Software.


