![]()
![]()
You are here:
![]() Vasid Qureshi VIP Contributor.
Vasid Qureshi VIP Contributor.
Are you a student? Are you an employee? Are you a business owner? It’s no matter what you are, everyone has the opportunity in this modern era to earn money through Blogging. This is one of the best ways where anyone can easily make passive income with smart blogging techniques.
If you are a newbie to this niche and have no idea about “what is blogging?”. Then nothing to worry about, as in this guide I will show you how to create your first blog easily by using SeekaHost App and get it live on Google.
In Simple words, Blogging is the process of sharing your thoughts or ideas on a specific niche as articles, infographics or videos in online where normal users can access it through the Internet.
If you are planning to start a blog then you should choose the niche in which you have more interest. It can be sports, beauty, food or anything. Just you need to be more productive and capable of sharing fruitful information to the users in your chosen niche.
Nowadays many people are into blogging, some are starting as part-time work and later turning it into full-time work once they start seeing the income flow from it.
Blogging can be a big passive income source for you if it’s done in the very right way. The only thing that the newbies will miss out on in blogging is not being consistent. When it comes to modern blogging, the more you are consistent with the works, the better the results you will get in return.
So, How to start blogging? Here is the step by step guide to starting a new blog from scratch using the SeekaHost App
Article summary on how to start a blog using SeekaHost App
By using the SeekaHost App, it’s very simple to create a blog. It’s not more technical like other web hosting providers. SeekaHost App has made the task for the bloggers simpler and using this platform, you can start your first blog within five minutes of time. Also, you will not need the developer’s support to create a website, everything is made simple with SeekaHost App.
Below are the only steps involved in creating your first blogging website using the SeekaHost App.
These are only the complete steps involved in creating a new blog with the SeekaHost App. Now let’s see each step in more detail and so you will get a clear idea of starting a blogging website from the scratch.
To create a new website, you need to pick a unique domain name for your website. Since you are planning to start a blogging website, it is better to choose the domain name relevant to the niche which you are targeting.
There are some tips for choosing the domain name and following some of the below-listed tips will help you to succeed in blogging,
While buying the domain name, try to choose the domain registrars like SeekaHost App where you get the .com domains at a very cheap price when compared with the other providers.
Also, another main thing to note is that it’s always better to choose the domain name and the hosting from the same place, so you can manage everything under one account and in one dashboard like SeekaHost App. This makes the blogging process easier rather than complicating.
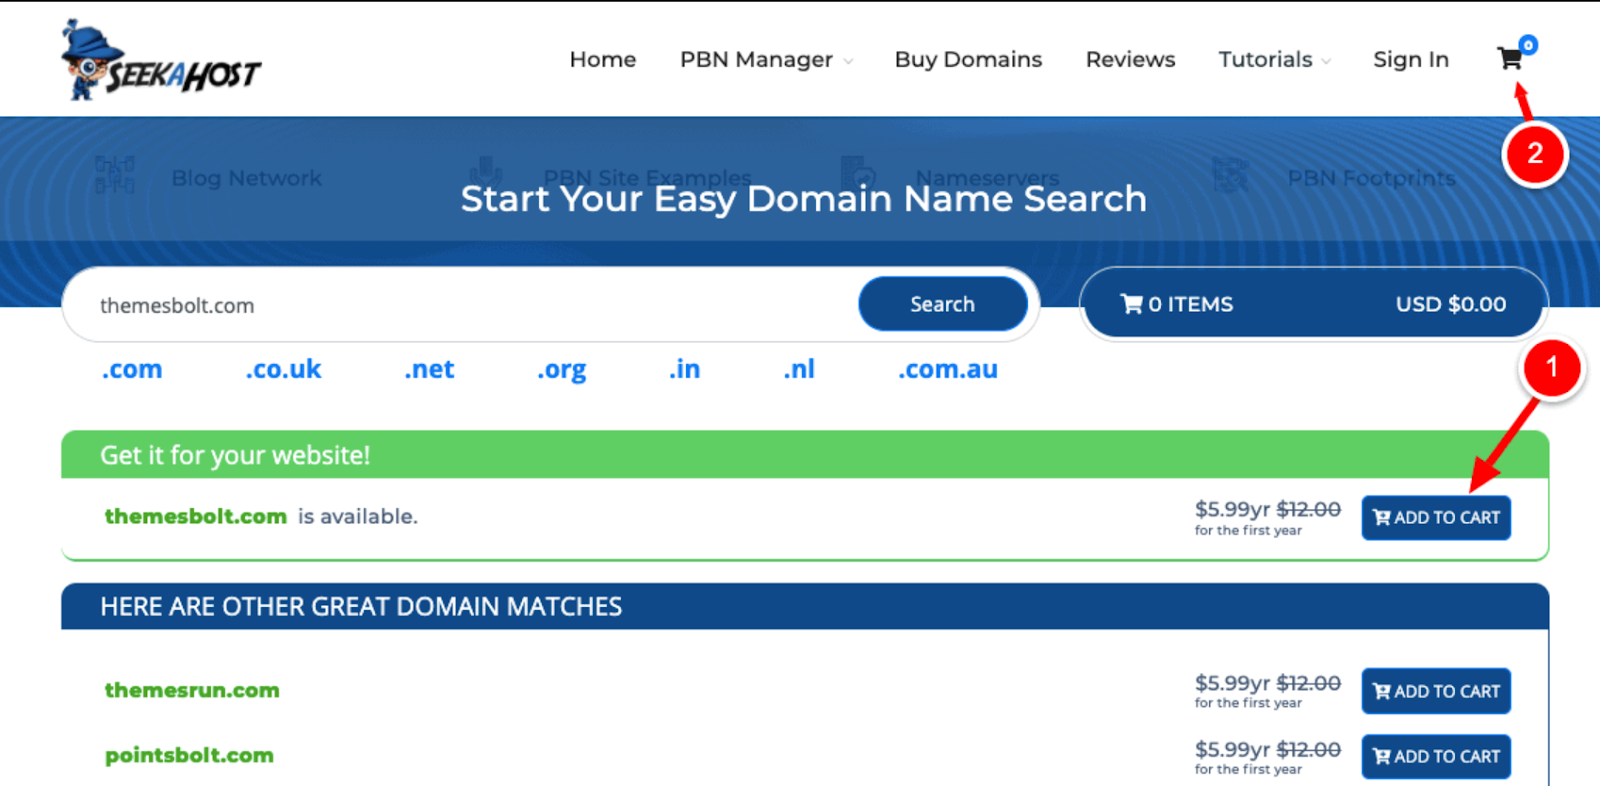
You can easily “create an account” in the SeekaHost.app and just search for the domain name which you are looking for in the Search Box available in the website as shown in the below image,
If the domain name which you are looking for is available to buy then you will see the available message as shown in the below image.
Now click on the “Add to Cart” option, so the domain which you have selected will be added to the cart and will be ready to be registered under your account.
In the next step, you can click on the “Checkout” option as shown in the below image and now the domain is ready to be registered.
In the next step, enter your details as shown in the below image and start processing the payment to register the new domain name.
Even you can choose more than one year for the domain name and get the domain registered rather than renewing every year.
After selecting the number of years, you can click on the “Continue to Shopping” option as shown in the above image.
In the next step, you can enter your basic information like address and contact details as shown below and proceed with payment.
Now you are in the final step, where you can choose your preferred payment option and click on “Order Now”
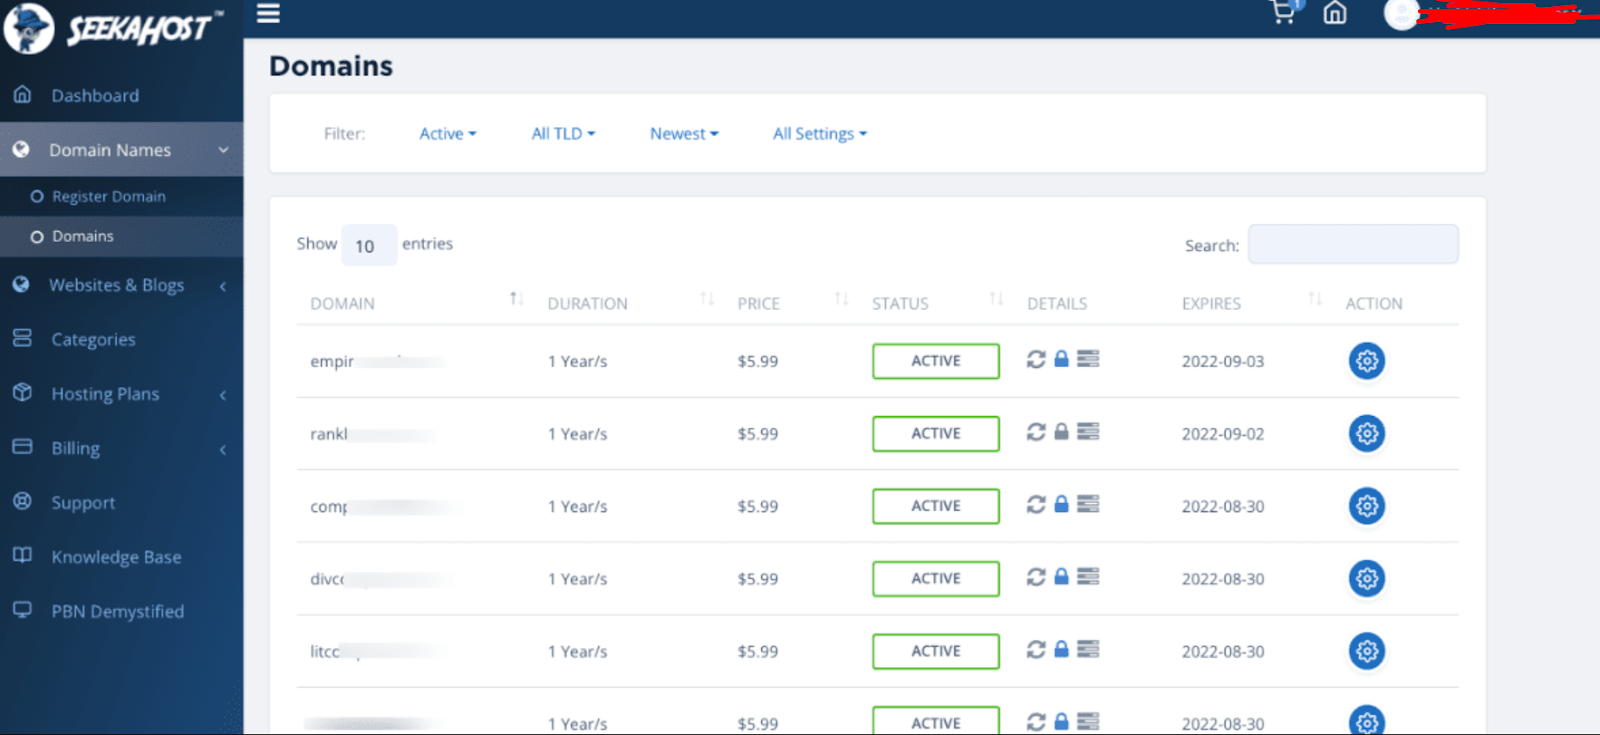
Now the domain registration process is fully completed. Once the domain is registered successfully then you can see the list of active domains under your account as shown below,
The main advantage of the SeekaHost App is that they have a wide range of packages where you can choose the custom web hosting package based on your own requirements. Even if you are planning to host one website or multiple websites, SeekaHost App has the best packages to suit your needs.
Now I will show you the steps involved in buying the WordPress hosting package from the SeekaHost App.
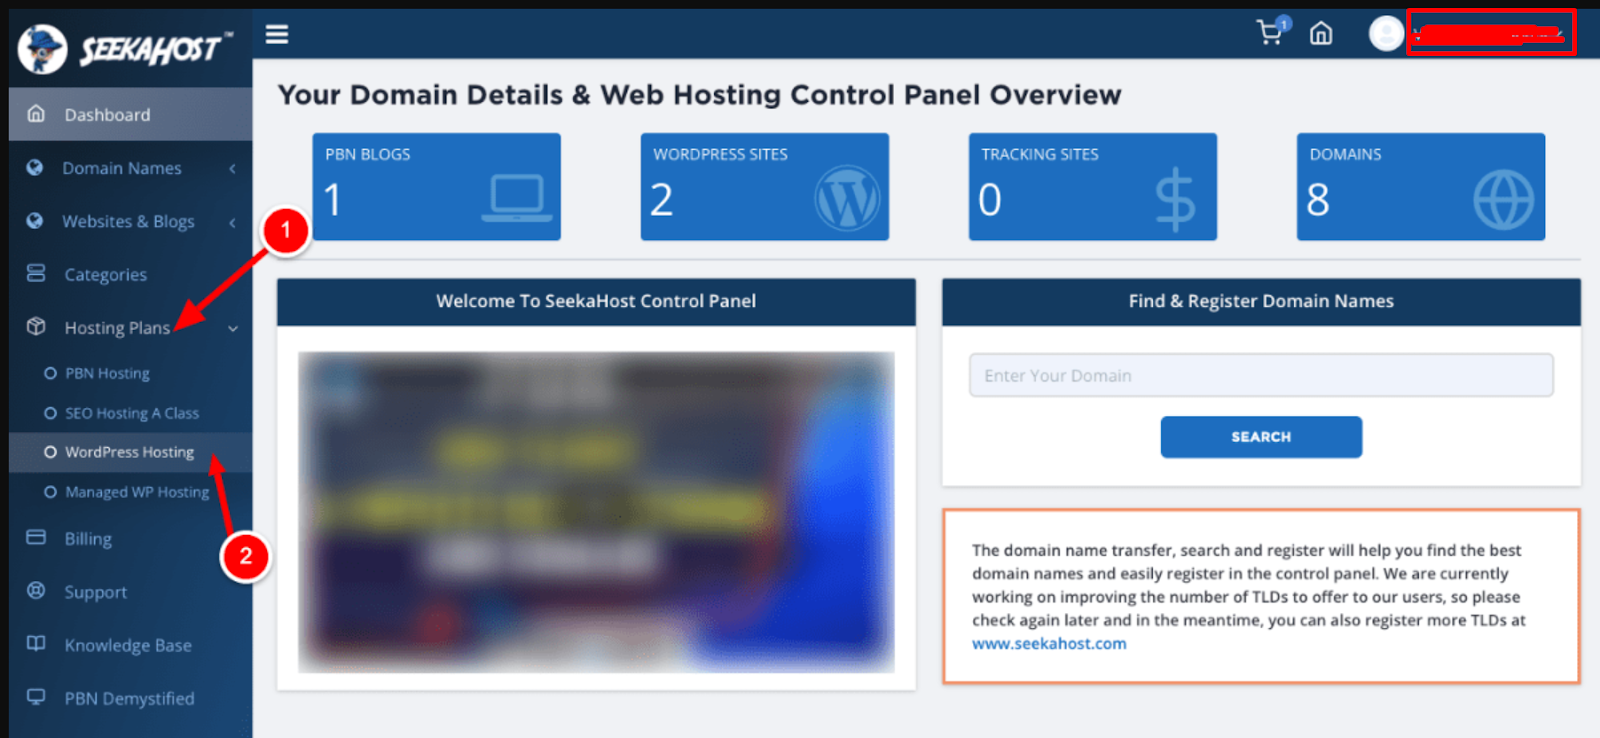
To buy a hosting from SeekaHost App, you can login to the same account where you have registered the domain name and you can see the hosting packages in the same dashboard itself.
You can click on the “Hosting Plans” drop down in the left side bar and select the “WordPress Hosting” as shown in the below image.
There will be lots of packages available like PBN hosting, WordPress hosting, Managed WP hosting, etc. But since you are starting your first blog, you can proceed with the WordPress Hosting packages.
As mentioned earlier, SeekaHost App offers the packages suitable for both the single blog and for multiple blogs as well.
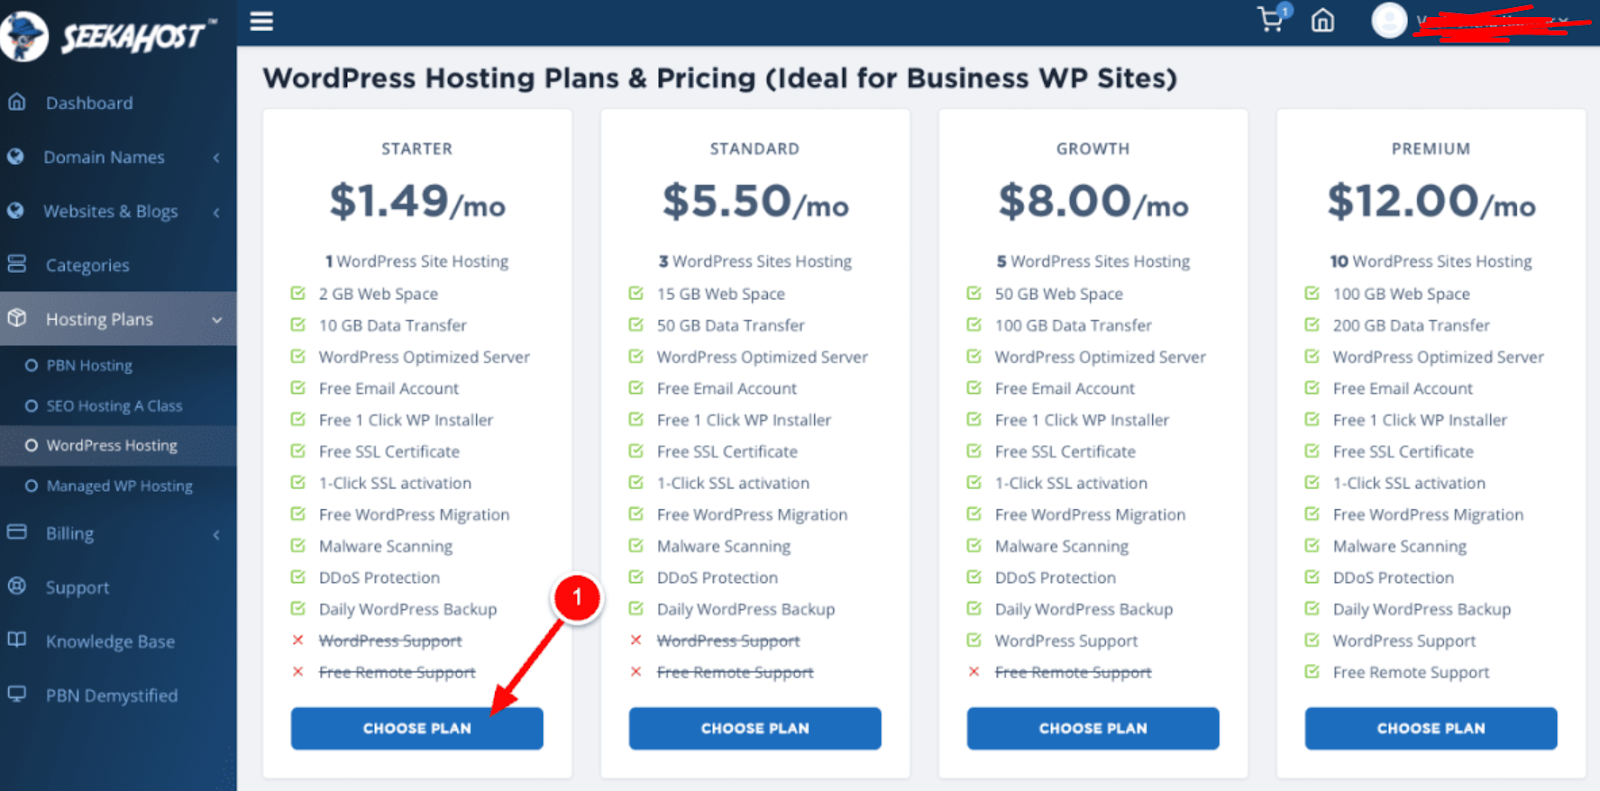
Since you are planning to host the one single website, you can choose the cheapest WordPress hosting package of $1.49 per month plan.
This plan comes with decent storage space with good data transfer volume of 10 GB. The main thing to note is that you will get the free email account, free SSL and many more bonus with the hosting from the SeekaHost App.
Now as shown in the above image, you can just select the “Choose Plan” and proceed with the payment process and complete the payment to buy the hosting.
Now you have both the domain name and the hosting. Now lets move into the next step of blog creation.
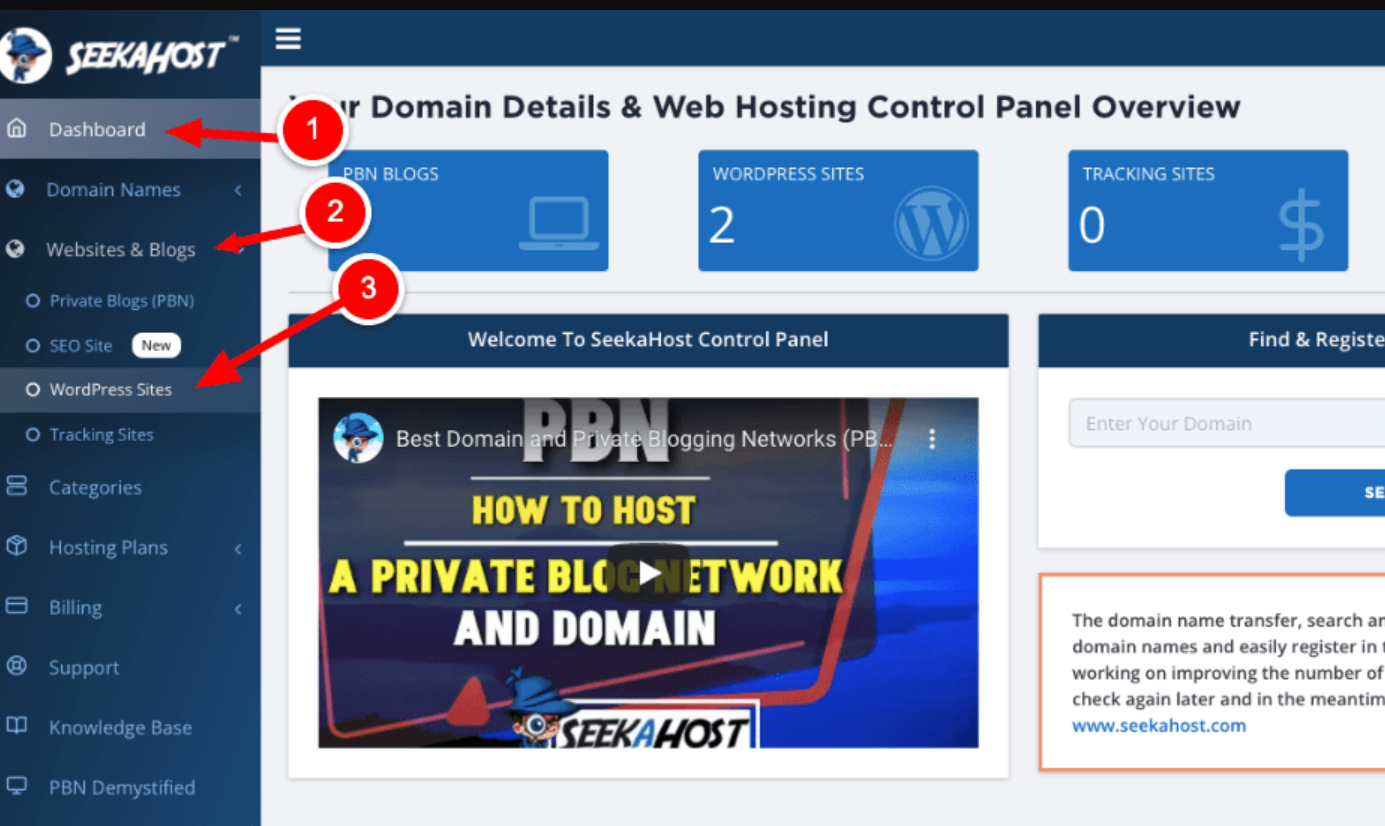
Just login to your account on SeekaHost App and click on the option “Website & Blogs” and under that “WordPress Sites”.
Now click on the “Create WordPress Site“ as shown in the below image and in the next step you will be asked to enter your blog information.
In the next step, just enter the blog name and the domain name in the required fields as like in the below image and click on “Add WordPress Site”
Now that’s it. WordPress will be installed your domain name automatically within seconds and also the login details of your first blogging website will be sent your registered email address.
Now before logging in, You need to update the nameservers to make the site live.
Now to make sure that your new website is live and running, you need to update the name servers as a final step. Here you need to point the domain nameservers to the SeekaHost App.
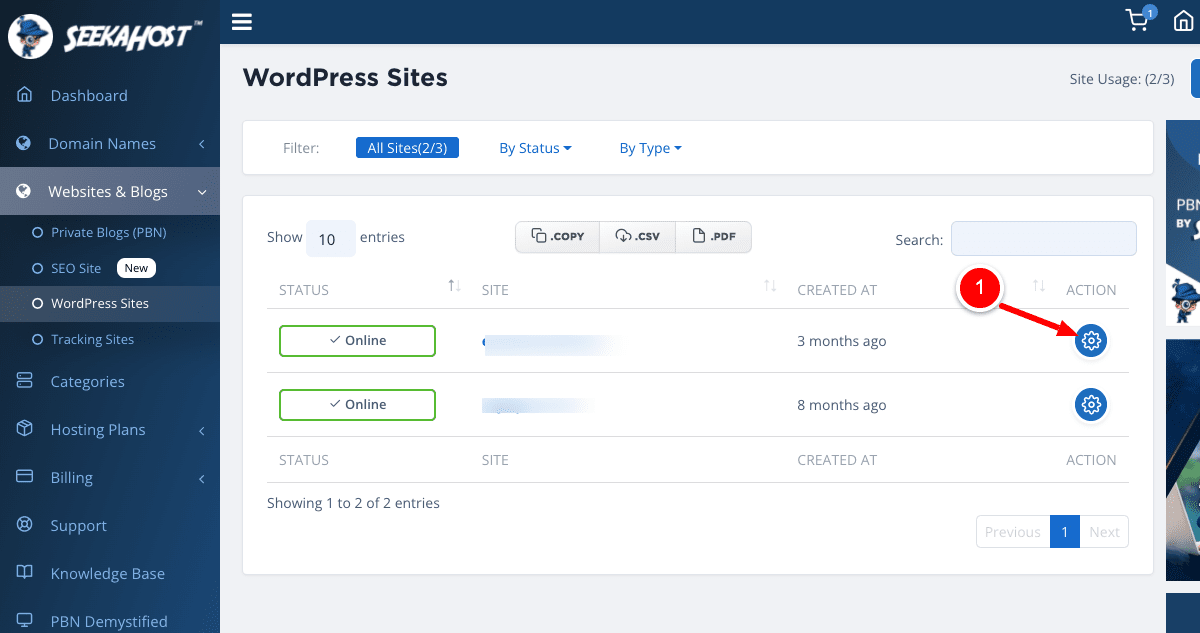
As like in the previous step, you need to navigate to the “WordPress Sites” option which is available under the “Websites & Blogs” option in the left sidebar.
Now as shown in the below image, click on the Settings icon which is near to the newly added website.
Once you click on the settings Icon, you will see the nameservers of the respective website as shown in the below image.
Now you need to point the domain name to the below nameservers, so the website will be live and running,
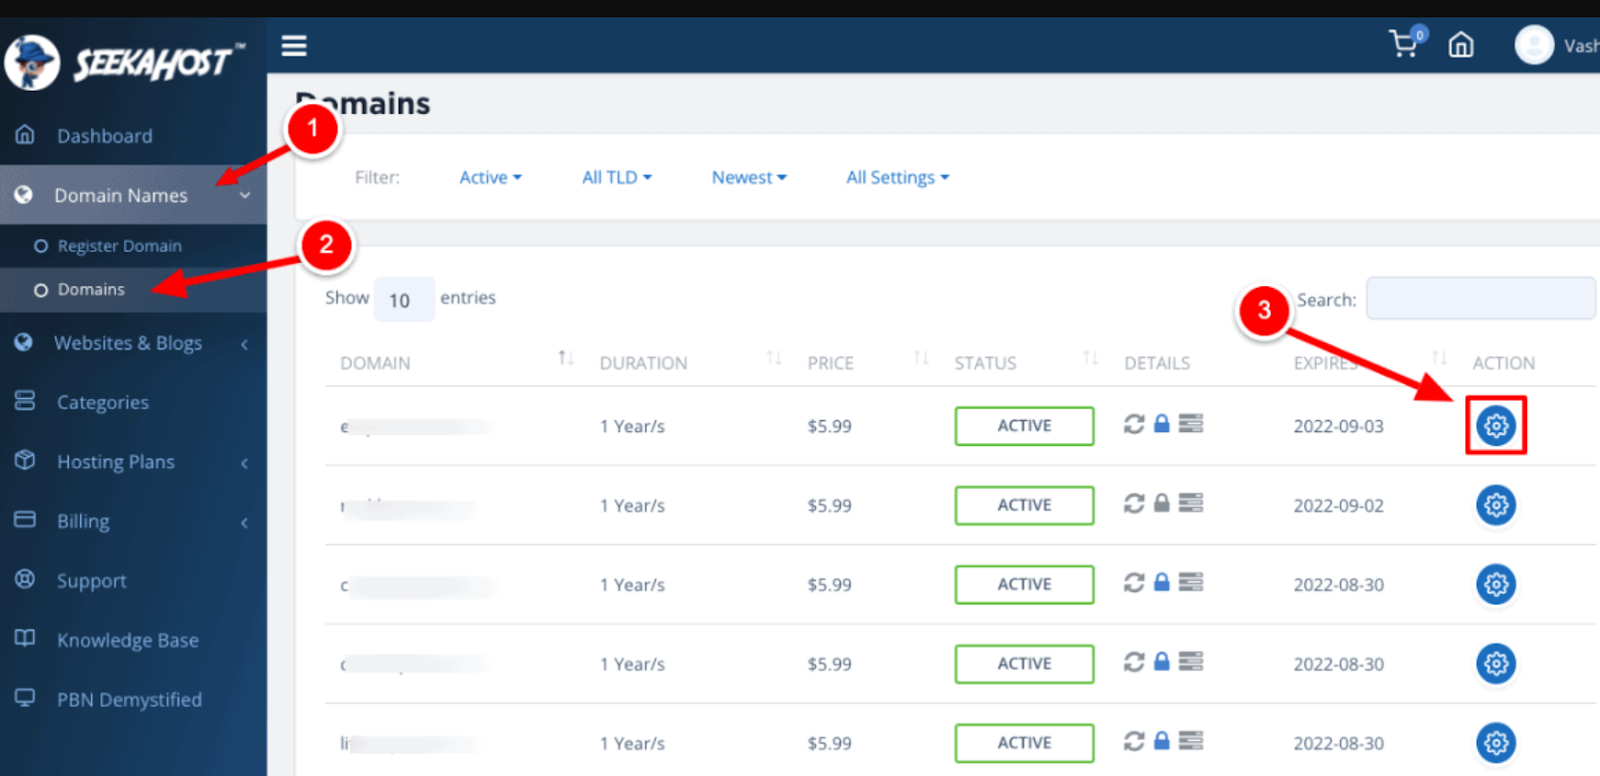
Now again navigate to the “Domains” section which is available in the left sidebar under “Domain Names” section. Click on the settings icon near to the domain name as shown in the below image.
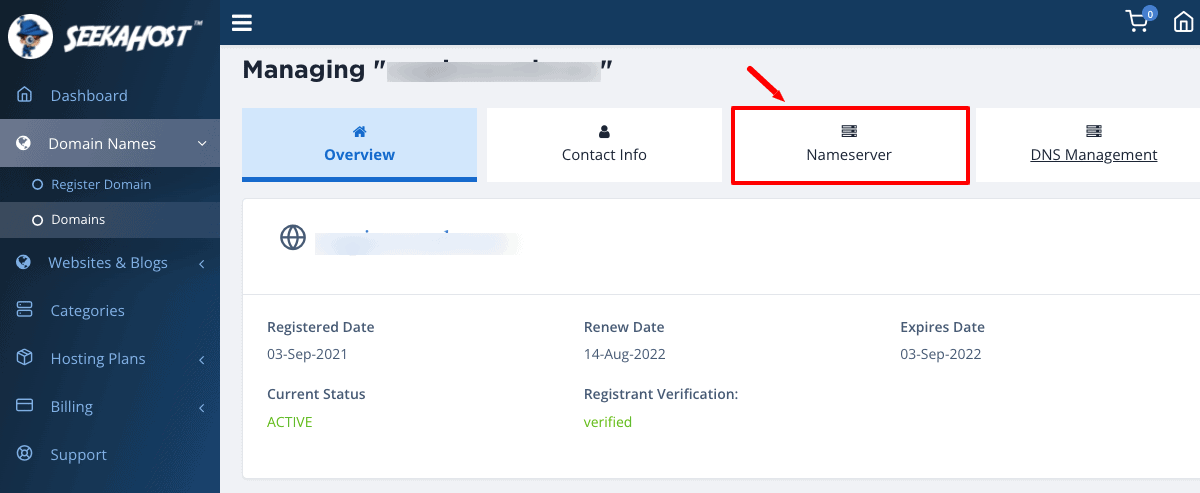
Now you will find the nameservers section under the respective domain name.
Click on the “Nameservers” section and enter the new nameservers which you have copied earlier.
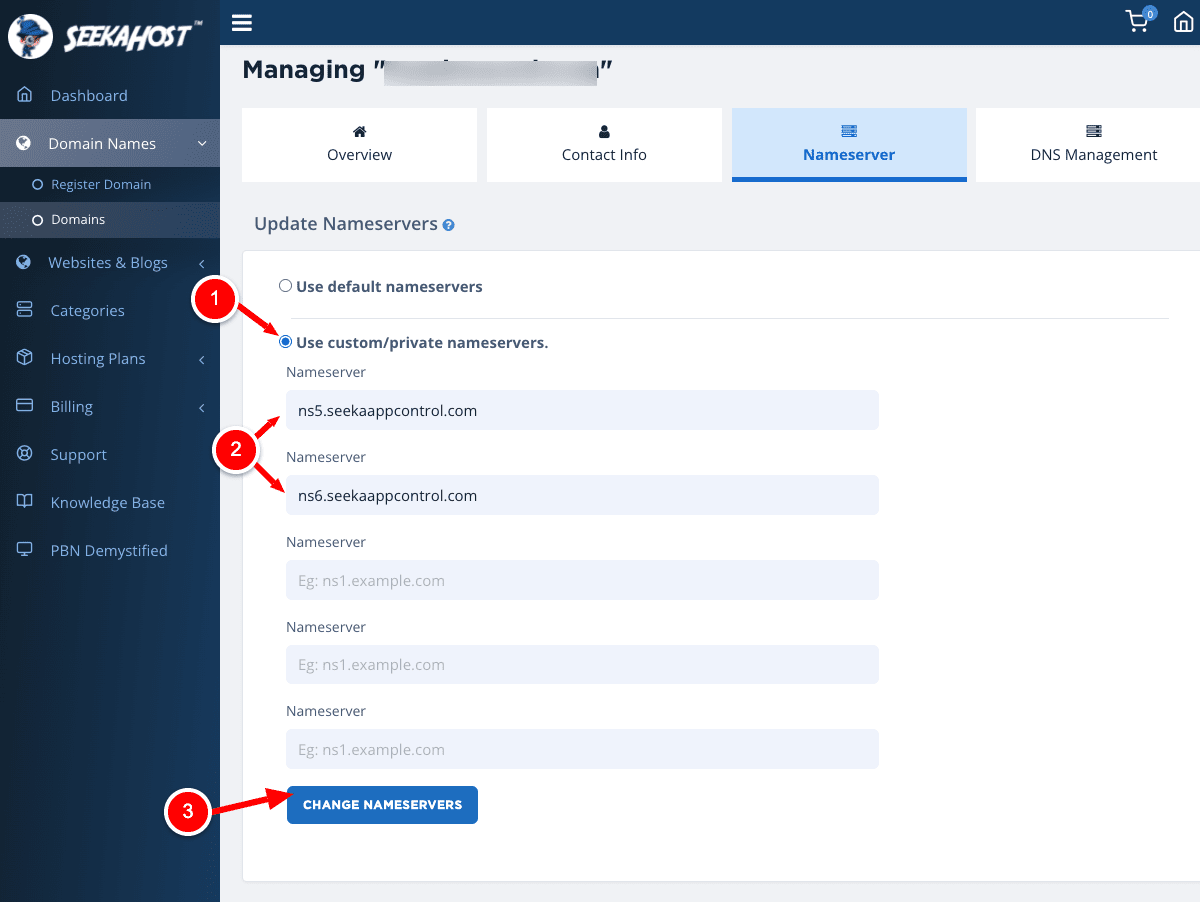
You need to click on “Use Custom/Private Nameservers” option and need to enter the new nameserver details as shown in the below image.
After entering the nameservers, click on the “Change Nameservers” option. Now the nameservers will get updated on the domain name.
Now the job is done, Nameservers are updated.
SSL Certificate will make your website to load in the HTTPS version and make the connection secured between the user’s computer and the server.
Even if you are having a normal blogging website or a eCommerce website, it doesn’t matter. You need the SSL to be integrated properly in your website to protect the communication between the user’s computer and the server system. Having SSL will also make your website look more authentic than other websites.
Now you need to again navigate to the “WordPress Sites” section like you did before. Click on the Settings Icon next which is next to your newly hosted website.
Select the “SSL” option which is available in the right bar and enable the option as shown in the below image.
Now the SSL installation is done, your website will be loading now in the HTTPS version with the secured connection.
The main advantage about the WordPress CMS is that there are lots of inbuilt themes and the plugins which you can install it and use it.
By using the prebuilt WordPress themes, you can easily create a new blogging website in one click and later configure it to the perfection.
Sameway, you can make any kind of integrations and the configurations in your website by using the available free and premium WordPress plugins.
Installing the WordPress theme to the newly hosted site is very simple. You can login to your new blogging site with the login details which was sent to your email earlier from the SeekaHost App.
By default, your blog will load with the default theme. If you need to add or modify the theme, you can do that under “Appearance”.
Similarly if you need to add any new plugins, you can select “Plugins” and “Add New” to upload any new plugin and configure it.
Thus installing Themes and Plugins is very simple in WordPress.
So now all done, You have registered a new domain name, bought the hosting, updated the nameservers, activated the SSL and got the website live up and running on Google.
Now I will show you how to publish your first blog post in the new blogging website which you have created.
Now login to the WordPress dashboard by using the login credentials which you have received to your email from the SeekaHost App. Even you can reset the password later by resetting it.
To start writing your first post, select on the “Add New” post under the “Posts” option as shown in the below image.
In the title section, you can enter the new blog title which you are planning to write.
In the text area section, you can add the text content and start writing your first blog post. Working the WordPress is similar to working on the MS Word, You will have all similar options and you can even add any kind of media files like images, videos, infographics, etc.
You can also add internal links, external links, heading tags and many more things in the text area as per your requirement.
Once you completed all your writing stuffs on the selected topic, Than you can click on “Publish” which is available on the right side of the WordPress dashboard.
Now the post which you have written will be published and will be live on the website. So now any user who is visiting your website can see your first blog post which you have published.
Blogging is very simple,…Isn’t it!
Now you have completed all the steps involved in blogging and your first blogging website is live on Google with the first blog post written by you. This is very simple and anyone who are new to blogging can learn the skills easily and start creating their first blog.
There are lots of opportunities available to make money from blogging. Some of them are affiliate marketing, Google AdSense, Banner Ads, Guest Posting, Niche Edits, and many more.
Especially if you are a student or a business person looking to have a passive income. Then blogging will be one of the best choices for you. Many who have started blogging part-time are working in Blogging full-time to increase the steady income flow from it.
The most common mistake that newbies make in blogging is not being consistent. When it comes to blogging, you need to be more consistent and work regularly in your chosen niche to see the results. You should consistently publish blog posts, do social shares and build links to build the brand value for your blog.
So, don’t wait. Just create your account today in SeekaHost.app and register your first .com domain name for a very cheap price. You can also get the WordPress Hosting at the best offer price and get your first blogging website live today.
If you are new to blogging then go through the tutorials about creating the website which is available at SeekaHost. You will get a clear idea about blogging and SeekaHost App is one of the best platforms to get started with blogging.
See more
Vasid Qureshi is Journalist at Dope Entrepreneurs, covering Finance, Business, and Entrepreneurship Topics.
110 Shares
61 Shares
Anne Alo February 1, 2022, 5:34 pm
41 Shares
![]() Lost Boy Entertainment February 1, 2022, 5:00 pm
Lost Boy Entertainment February 1, 2022, 5:00 pm
12.2k Shares
Genxee February 1, 2022, 3:24 pm
36 Shares
![]() Lost Boy Entertainment February 1, 2022, 2:47 pm
Lost Boy Entertainment February 1, 2022, 2:47 pm
66 Shares
Genxee February 1, 2022, 2:43 pm
12.2k Shares
Genxee February 1, 2022, 7:29 am
Sorry, no posts matched your criteria!
Advertise With Us
Contact Us Now
2021 © Influencive LLC
Follow us on FB to make sure you never miss our latest content.